![]() ATP - Advanced Trading Philosophy
ATP - Advanced Trading Philosophy ![]()
The Regurgitation to Wave Riding
![]()
![]()
![]()
![]()
![]()
My good friend, FreddyFx, reminded me of all the good work I used to do on FF in not only trying to become a good trader myself, but in helping others become good traders along the way. As such, I decided to regurgitate my old title which I started to give to everything we were working on. That title is of course ATP - (Advanced Trading Philosophy). And, since there is no question in my mind that what the testing of my last thread turned into was trading waves. I have thus regurgitated this old name, and simply made reference to its contents; wave trading.
This is simple wave trading however, as I do not wave count. Although if you want to post charts with your explanations on how you count waves, you are more than welcome to. You will just not see that from me.
I am sure that there are many threads similar to this out there, so it goes to show how powerful wave trading is. I happen to think that I have the simplest method for perfecting it.
When it comes to waves the only things that I am concerned about are:
(1) Did the new wave give us a higher high, a lower high, a higher low, or a lower lower, and
(2) Was it a true wave, or was a more of a flat range with very little arc?
The answers to these two questions are all I need to know to determine what I may want to do next!
Templates:
This template is for the 1d and 4hr charts
This template is for the 1hr charts
This template is for the 30m charts
Of course, you are welcome to edit them as needed.
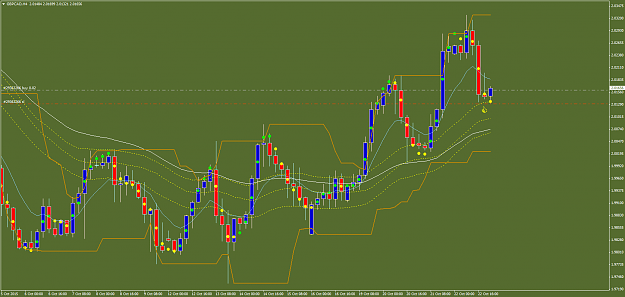
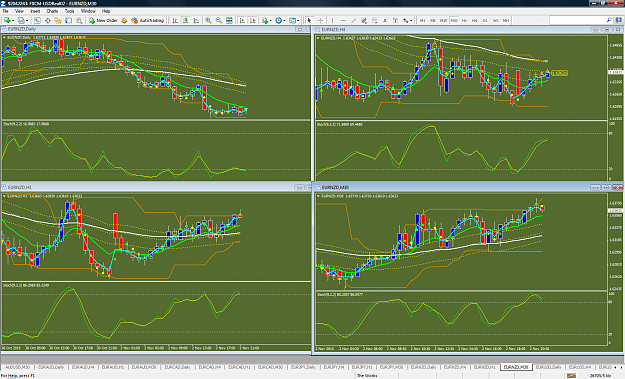
I have my profile set up so that it is easy to pull up the 4 t/f's of any pair that I want, in such a way that I can do it quickly, and be able to get a thorough view of the larger, smaller, and present picture for that pair. Here is a picture of just 1 pair. All the rest are set up the same way, just by clicking on the 4 t/f's for that pair. Make sense?
Indicators:
This indicator was one that FerruFx made for us from the other thread. It has many nice features, and many nice adjustments that one can make to it which will direct the indicator to give a signal if one, two, or three indicators line up.
I did a few weeks worth of testing with this indicator and even put it in the Strategy Tester within MT4, changing many settings. I found, that the best thing was to just use the NLD indicator by itself, and determine the wave position when I came to my computer, after getting an alert.
As such, this indicator is not part of my template, but it is a very powerful indicator nonetheless, and I put it here as you may want to use this indicators wave arrows to trade this system, rather than using the NLD, which would be perfectly acceptable. However, no matter which indicator you use to give you alerts, you will still need to know the answer to those two very important questions.
This is the indicator that I use for my alerts. I have it set up that when we get a color change the alert goes to my cell phone, among other places. Just because I get an alert does not mean that it is time for me to take a trade. Before I do anything, I have to answer my two questions above. Then depending on my answers, I will either not enter at all, enter right away because the color changed, or wait until the bar closes and the NLD has also closed in a color change.
34 EMA H/L/C
I call the combination of these three EMA indicators the highway. I am not going to go too much into them and how they work, as there is a whole book about them which you can read, and I will also be glad to answer individual questions. I have used this many times in my past, and in my testing during my last thread, I brought it back, and decided that it should stay, rather than the channels.
9 EMA & 50 EMA
I use these two indicators for further verification of the trend, and love it when they happen to be a part of some sort of S&R for price action. The 9EMA is also another great indicator which can be used to determine wave action, along with the NLD, and even finding divergence. When the 9 EMA changes the directions, answer your two questions, and away you go!
The channels indicator is another indicator which can help show tops and bottoms, and can be used to determine s/l and t/p points. I love having this tool on my chart, as it gives dimension to the candlesticks relative to space, along with so many other features.
Stochastic Oscillator 9,2,2 EMA
The stochastic is another tool that we use when trying to determine if we should take a NLD or 9 EMA wave signal. The easiest way to put it is that one should wait to go short until the stochastic is above 80, and wait to go long until that stochastic is below 20. You could even play it safer by modifying your o/b, o/s levels to 85, 15.
The second thing that the stochastic is good at recognizing is divergence. I am not going to go into it here, but if you do not know what divergence is, and you want to be a successful trader, I suggest you learn about it. There is plenty of free material out there to help you master this powerful technique. Be-careful however, as any indicator can give you a false divergence move, and there is also a inverted divergence which is just a powerful of a trade. If the stochastic shows divergence, and we get another wave signal, I might consider doubling down. However, if the stochastic ema's were at a shallow angle and you get divergence, watch out for the fake divergence. It is better when the ema's are steeper, as that is the true wave market. Flatter ema's can mean a trend, and a trend is more powerful than divergence.
Another thing about stochastic is the information that the value and signal ma's give you. If the value ma is about the signal ma on the 1d chart, it will give you an idea about how to trade for a run on the 4hr chart. Like wise, if the same were true on the 4hr chart, it would give a direction for possible trading the 30m bar for some intra-day fun.
Advanced Trading Philosophy: Rules for Trading this System
1. Best Time Frames to Trade - I find it always best to trade the higher t/f as they are the most powerful, and in Forex, I want power on my side. That means that the 1d and the 4hr would be the safest t/f to trade. However, for intraday traders, or if you are like me, and you have a few hours once in a while when you would like to trade a smaller t/f, this system will work on any t/f. My only advice is to try to trade it in the direction of power, and if you go against power, make sure you know when it is time to t/p.
2. Trading with the Trend - If the 9 EMA is below the 50 EMA, then primary wave trades should be taken short only, while continuation/momentum wave trades or divergence trades should be taken long. If the 9 EMA is above the 50 EMA, primary wave trades should be taken long only, while continuation/momentum wave trades or divergence trades should be taken short.
Primary Trades: 9 EMA above 50 EMA (Opposite when the 9 EMA is under the 50 EMA)
A. Stochastic goes below 35 (above 65 for opposite trade) level on stochastic oscillator.
B. In real time:
1. Stochastic Oscillator - Value line crosses trigger line
2. Non-Lag Dot (NLD) - Dot turns from down signal to up signal (from up signal to down signal for opposite trade)
C. Once both these items are found to be true, the rules of the Primary Trade have been met, and it is safe to enter a long trade (short trade for the opposite direction of EMA's).
3. Trading with Momentum - If the 9 EMA is below the 50 EMA, then secondary or continuation/momentum wave trades should be taken long. If the 9 EMA is above the 50 EMA, secondary wave trades or continuation/momentum wave trades should be taken short.
Secondary/Momentum Trades: 9 EMA above 50 EMA (Opposite when the 9 EMA is under the 50 EMA)
A. Stochastic goes above 80 (below 80 for opposite trade) level on stochastic oscillator.
B. In real time:
1. Stochastic Oscillator - Value line crosses trigger line
2. Non-Lag Dot (NLD) - Dot turns from up signal to down signal (from down signal to up signal for opposite trade)
C. Once both these items are found to be true, the rules of the secondary Trade have been met, and it is safe to enter a short trade (long trade for the opposite direction of EMA's).
4. Realities of Real-Time Trading - The realities are that I set forth these rules based on the risk I am willing to take of taking trades when we get a signal change, at the time that we get a signal change. When taking a trading upon a signal change and not waiting for the bar to close with the signal change being in place, I will get some false positives. Here are the reasons why I am able to live with the false signals I will get:
A. Losses are going to happen. I figure that if I am going to lose by taking an early entry, then there is a good chance I would have taken a loss if I had waited for the bar to close to enter, had the signal was still valid.
B. Because taking a signal intra-bar rather than waiting for the bar to close gets me in closer to my s/l means that I would likey lose few pips than if I were to take the same lose from the close of the bar.
C. With an early entry, and a tight s/l; re-entry is always a possibility.
D. Being successful on an early entry will most likely result in great numbers of banked pips, far outweighing the negatives of being wrong on an early entry.
5. Getting Emotional in the Moment - Making a trade from an emotional place rather than a clearly thought out and logical place based on your rules, can have you doing things that you will later regret. I have heard people say that rules are meant to be broken, but this is incorrect. Rules should not be broken if you don't agree with them or they aren't working for you. Breaking the rules is the emotional response. Instead, rules should be changed to something better; something that you will no longer break. So, follow your rules, and if you find you are breaking them, then change your rules. One thing that might help you from becoming emotional during your trading, is before you make a trade, take a screen shot and re-evaluate your chart without moving parts. If, you see things the same way, then take the trade.
6. Enjoy Yourself - If you want to make trading something that you want to do for a full-time income. Start by enjoying it now. Even those losses are helping you get there, so embrace them, welcome them into your life, and even invite them to sit at your table. It is alright to scold yourself for making a trading mistake, but don't get so mad that it ruins your day, or worse yet, makes you seek revenge on the market or someone else. If you are not enjoying your time trading. Perhaps it is not the right thing for you.
7. What Pairs to Trade? - You should not limit yourself. This is a great system, and so you should trade every pair that you are comfortable with. You are going to find out that many times, multiple pairs with give you triggers. I personal have my profile set with 15 open pairs, watching 4 t/f's per pair. It might seem like a lot, but one does not have to even have to open up a pair unless they get an alert from the NLD or any other combination of indicator alerts from the multi-indicator alert which FerruFx so kindly coded for us.
8. Volunteering can be a Stepping Stone - Taking some of your time to help someone/others in need without thought of return compensation will compound exponentially towards the fruition of your ambitions.
![]()