Welcome Fellow Forex Factory Associates:
Trading here is about first finding momentum, but has nothing to do with the momentum indicator. In fact, I use no charts or any other fancy methods that tell me when I should trade. Trading here is about pure price action and how it moves in and around the previous bar. Wow, I can't believe that it has been 8+ years already since I started my journey into Forex trading, but here it is, 2015. Indeed, it was a journey that I do not regret not even on single minute as I now have a freedom that I only dreamed about those many years ago. But, I cannot let down my guard or become complacent in my trading, as it can still be taken from me much easier than it is for me to earn it... and in that lies the answer as to why I am here.
I am here so I can share how I am trading, learn new things from others to better what I am doing, and to hopefully, through my sharing with others, and putting some of my trades on the forum, remember the importance of not jumping the gun, but waiting for the set-up, even if one does not happen for a few bars.
So, with that, I will give you the two types of systems which I trade, and the types of set-ups which I look for, which can turn into trades if everything is right. Both systems are best used in trending markets. I am into being in the market less, and taking fewer, yet safer trades. I would rather keep my money by not trading when the market not trending, and come back when the market is back in a trend when I know I will be safe, things will react mostly as I would expect them to, and I can safely hit the market with higher than normal lot sizes. So let's get started.
The second system I trade can be found here: http://www.forexfactory.com/showthread.php?p=8482362#post8482362
Because both my systems use the same indicators and templates, I am just going to use this thread to update anything regarding my templates or indicators for both threads on this thread so that I do not need to do it in multiple places. Thanks for your understanding.
Pairs I trade: For both The Slingshot trade, and The Zipper Trade, their is no need to limit yourself to any certain pairs. I find that they are best to trade on the 4hr tf.
My Templates:
30M:
4Hr:
D1:
My Indicators:
NonLag:
Channels:
Things to help you make a trade:
First off, all trades are made off the 4hr bars. However, it is important to make sure that it is a good idea to trade in the first place, so there are a few things that you should verify every time you step to your chart to view the new 4hr bar.
1. Does the non-lag dot on the 4hr bar match the non-lag dot of the D1 bar? If yes, then it is good to trade in the direction of the dot only. If one dot is red and the other dot is blue, it might be a wise choice not to trade for that bar. If both bars are red, than you would be looking for short trading opportunities for that bar.
2. Are the non-lag dots on the previous two 4hr bars the same color? If yes, then it might be alright to trade. If no, it may mean that the market is very volatile and unpredictable, and it might not be the best idea to make any trades on this bar.
Trade type 1: The Slingshot trade
1. The sling shot trade is best traded in the direction pointed by the non-lag dots on the 4hr and D1 charts when they are the same color. It is best not to trade the slingshot trade if one time frame has a blue non-lag dot and the other time frame has a red non-lag dot. Pick some pairs, and it will literally take you minutes every 4 hrs to determine if you should wait for a trade or not.
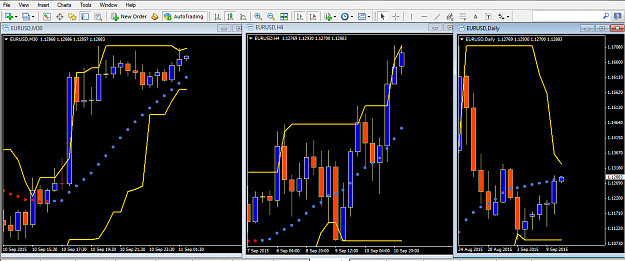
2. Here is a picture of my chart. From this view, I can easily tell if my 4hr and my D1 non-lag dots are congruent. As you can see, my screen also shows a 30M chart, which has to do with my second system I trade which is on another thread, which also needs more work, and I hope to finish in the near future as well. I have this set-up for all the pairs I trade, so I all I have to do is click three buttons and I have a pretty good idea of what the market looks like for each pair, for each type of trade.
3. Beware trading this around the time of the open of the new bar, as the spreads tend to be quite high, and can just be a pain in the neck for any short term trading strategy.
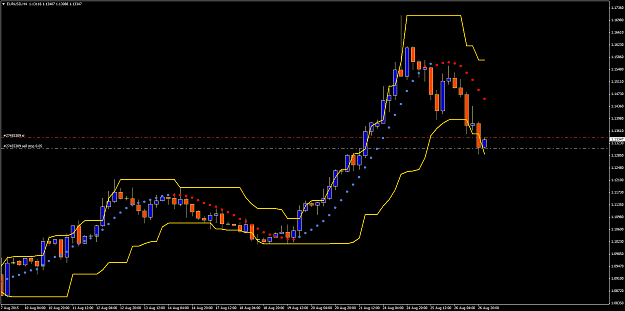
4. The Trade Itself: Once you have decided you are going to trade, you are going to be looking to go long if the previous bar had a blue body and go short if the previous bar had a red body. Make sense so far? Let's use a long example as I think people naturally find it easier to be buyers than sellers. So okay, previous bars body closed blue. What you next are waiting to happen is for the current bar to come back down, over 1/2 the distance down the body of the previous bar. Waiting until it went 3/4 or all the way down is even safer. Once this milestone is reached, you would set your trap and place a buystop order at the top of the body of the blue bar, with your sl set at a safe distance for you. Now, if your order does not trigger during this bar, you should delete it. Also, you should delete an open trade once this 4hr bar closes as well. This is basically a one bar trade. Bars can fluctuate too much from one to the next, and you could easily loose all your profit by leaving it open, into the next bar.
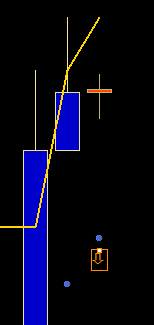
As you can see from this cropped recent chart. The most recent bar went reversed down at least 1/2 the body of the previous blue bar. So, you would set a BuyStop at the top of the previous blue bar, so if price reversed, it would trigger it, hopefully on its way up. However..... at this particular time, the 4hr non-lag dot is blue, but the D1 non-lag dot is red, as I have marked with the red down arrow on the chart you are looking at. So, more than likely I would not take this trade at all. The only way I might consider taking is if the current bar had went all the way down below the previous bars blue body and came back up. With the 4hr and D1 non-lags in a battle, I would want to wait for an opportunity that was more sure a win and less like gambling.
5. This will also work well on the D1 charts! Play it out the same as I have described on the 4hr charts, with the exception that it is not necessary to look to the W1 charts for non-lag confirmation, due to the strength of a daily bar. Just take them as they come.
I hope that this first trade style has made sense to you, and that you have a good time with it. Please fee free to ask me any questions, and when I actually do make a trade based on this style, I will be sure to post something about.
Trade type 2: The Zipper Trade
1. The Zipper trade is really quite simple. Once again, I use the 4hr bar, and I get the best results when the non-lag dots of both the 4hr and the D1 charts are the same color. This is one of my favorite trades actually! I love it when it presents itself. Unfortunately, I missed just about every available opportunity to make this trade this week. It has a very good win ratio.
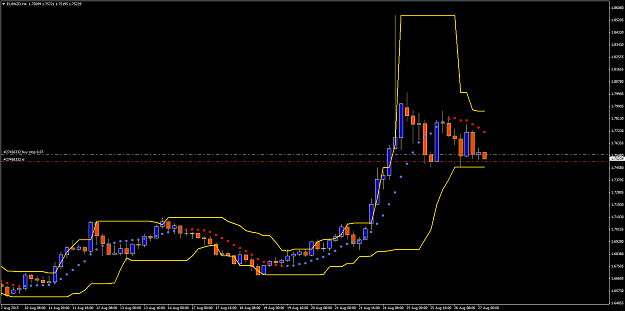
2. Here is how the set-up works: Let's say that I am looking for long trades because both the non-lag dots on both the 4hr and the D1 chart are blue. For us to take a long trade, we must first have candlestick that closes red. Simple right? Once we get that candlestick that closes red, on the next bar, we simply place a buy stop order at the top of the body of the previous bar with a stop loss at the low of the body of the previous body (or where you are most comfortable putting it), and see what happens. Come on back in 4 hours and see if your trade triggered, and if you ended up with some nice profits. It might also me a good idea to set a take profit, trailing stop, or be around to manage your trade as necessary. Make sense?
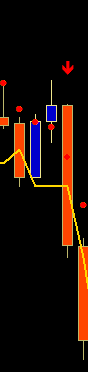
If you look at the chart above you can see that the non-lag is red. Then, there was a candlestick that closed bullish. So, below the body of the previous candlestick, I would set a sell stop order, with a stop loss. As you can see, this turned out to be a great zipper trade.
I hope that I have been clear in my explanation. If you have any questions, please feel free to send them my way, and I will do my best to answer them.
Trade type 3: Trading Inside Bars and/or Smaller Type Bars
1. Coming soon !
Trade type 4: Reversal Trading
1. Example of a reversal trade with these indicators can be seen at post: #29, but it is a dangerous type of trade and I do not recommend it without much practice!
That is all for now... I will be back to finish this up later... maybe... right now, I have to head off to bed, as I need to be refreshed for trading tomorrow.
I hope that everyone will enjoy this thread. But, if for some reason you don't, is is your own fault !
Trading here is about first finding momentum, but has nothing to do with the momentum indicator. In fact, I use no charts or any other fancy methods that tell me when I should trade. Trading here is about pure price action and how it moves in and around the previous bar. Wow, I can't believe that it has been 8+ years already since I started my journey into Forex trading, but here it is, 2015. Indeed, it was a journey that I do not regret not even on single minute as I now have a freedom that I only dreamed about those many years ago. But, I cannot let down my guard or become complacent in my trading, as it can still be taken from me much easier than it is for me to earn it... and in that lies the answer as to why I am here.
I am here so I can share how I am trading, learn new things from others to better what I am doing, and to hopefully, through my sharing with others, and putting some of my trades on the forum, remember the importance of not jumping the gun, but waiting for the set-up, even if one does not happen for a few bars.
So, with that, I will give you the two types of systems which I trade, and the types of set-ups which I look for, which can turn into trades if everything is right. Both systems are best used in trending markets. I am into being in the market less, and taking fewer, yet safer trades. I would rather keep my money by not trading when the market not trending, and come back when the market is back in a trend when I know I will be safe, things will react mostly as I would expect them to, and I can safely hit the market with higher than normal lot sizes. So let's get started.
The second system I trade can be found here: http://www.forexfactory.com/showthread.php?p=8482362#post8482362
Because both my systems use the same indicators and templates, I am just going to use this thread to update anything regarding my templates or indicators for both threads on this thread so that I do not need to do it in multiple places. Thanks for your understanding.
Momentum Bar Trading
Pairs I trade: For both The Slingshot trade, and The Zipper Trade, their is no need to limit yourself to any certain pairs. I find that they are best to trade on the 4hr tf.
My Templates:
30M:
Attached File(s)
4Hr:
Attached File(s)
D1:
Attached File(s)
My Indicators:
NonLag:
Attached File(s)
Channels:
Attached File(s)
Things to help you make a trade:
First off, all trades are made off the 4hr bars. However, it is important to make sure that it is a good idea to trade in the first place, so there are a few things that you should verify every time you step to your chart to view the new 4hr bar.
1. Does the non-lag dot on the 4hr bar match the non-lag dot of the D1 bar? If yes, then it is good to trade in the direction of the dot only. If one dot is red and the other dot is blue, it might be a wise choice not to trade for that bar. If both bars are red, than you would be looking for short trading opportunities for that bar.
2. Are the non-lag dots on the previous two 4hr bars the same color? If yes, then it might be alright to trade. If no, it may mean that the market is very volatile and unpredictable, and it might not be the best idea to make any trades on this bar.
Trade type 1: The Slingshot trade
1. The sling shot trade is best traded in the direction pointed by the non-lag dots on the 4hr and D1 charts when they are the same color. It is best not to trade the slingshot trade if one time frame has a blue non-lag dot and the other time frame has a red non-lag dot. Pick some pairs, and it will literally take you minutes every 4 hrs to determine if you should wait for a trade or not.
2. Here is a picture of my chart. From this view, I can easily tell if my 4hr and my D1 non-lag dots are congruent. As you can see, my screen also shows a 30M chart, which has to do with my second system I trade which is on another thread, which also needs more work, and I hope to finish in the near future as well. I have this set-up for all the pairs I trade, so I all I have to do is click three buttons and I have a pretty good idea of what the market looks like for each pair, for each type of trade.
Attached Image (click to enlarge)
3. Beware trading this around the time of the open of the new bar, as the spreads tend to be quite high, and can just be a pain in the neck for any short term trading strategy.
4. The Trade Itself: Once you have decided you are going to trade, you are going to be looking to go long if the previous bar had a blue body and go short if the previous bar had a red body. Make sense so far? Let's use a long example as I think people naturally find it easier to be buyers than sellers. So okay, previous bars body closed blue. What you next are waiting to happen is for the current bar to come back down, over 1/2 the distance down the body of the previous bar. Waiting until it went 3/4 or all the way down is even safer. Once this milestone is reached, you would set your trap and place a buystop order at the top of the body of the blue bar, with your sl set at a safe distance for you. Now, if your order does not trigger during this bar, you should delete it. Also, you should delete an open trade once this 4hr bar closes as well. This is basically a one bar trade. Bars can fluctuate too much from one to the next, and you could easily loose all your profit by leaving it open, into the next bar.
Attached Image
As you can see from this cropped recent chart. The most recent bar went reversed down at least 1/2 the body of the previous blue bar. So, you would set a BuyStop at the top of the previous blue bar, so if price reversed, it would trigger it, hopefully on its way up. However..... at this particular time, the 4hr non-lag dot is blue, but the D1 non-lag dot is red, as I have marked with the red down arrow on the chart you are looking at. So, more than likely I would not take this trade at all. The only way I might consider taking is if the current bar had went all the way down below the previous bars blue body and came back up. With the 4hr and D1 non-lags in a battle, I would want to wait for an opportunity that was more sure a win and less like gambling.
5. This will also work well on the D1 charts! Play it out the same as I have described on the 4hr charts, with the exception that it is not necessary to look to the W1 charts for non-lag confirmation, due to the strength of a daily bar. Just take them as they come.
I hope that this first trade style has made sense to you, and that you have a good time with it. Please fee free to ask me any questions, and when I actually do make a trade based on this style, I will be sure to post something about.
Trade type 2: The Zipper Trade
1. The Zipper trade is really quite simple. Once again, I use the 4hr bar, and I get the best results when the non-lag dots of both the 4hr and the D1 charts are the same color. This is one of my favorite trades actually! I love it when it presents itself. Unfortunately, I missed just about every available opportunity to make this trade this week. It has a very good win ratio.
2. Here is how the set-up works: Let's say that I am looking for long trades because both the non-lag dots on both the 4hr and the D1 chart are blue. For us to take a long trade, we must first have candlestick that closes red. Simple right? Once we get that candlestick that closes red, on the next bar, we simply place a buy stop order at the top of the body of the previous bar with a stop loss at the low of the body of the previous body (or where you are most comfortable putting it), and see what happens. Come on back in 4 hours and see if your trade triggered, and if you ended up with some nice profits. It might also me a good idea to set a take profit, trailing stop, or be around to manage your trade as necessary. Make sense?
Attached Image
If you look at the chart above you can see that the non-lag is red. Then, there was a candlestick that closed bullish. So, below the body of the previous candlestick, I would set a sell stop order, with a stop loss. As you can see, this turned out to be a great zipper trade.
I hope that I have been clear in my explanation. If you have any questions, please feel free to send them my way, and I will do my best to answer them.
Trade type 3: Trading Inside Bars and/or Smaller Type Bars
1. Coming soon !
Trade type 4: Reversal Trading
1. Example of a reversal trade with these indicators can be seen at post: #29, but it is a dangerous type of trade and I do not recommend it without much practice!
That is all for now... I will be back to finish this up later... maybe... right now, I have to head off to bed, as I need to be refreshed for trading tomorrow.
I hope that everyone will enjoy this thread. But, if for some reason you don't, is is your own fault !
"Keep your eyes on the helpers" - Mr. Rogers