Daily System With BBands + MACD + Currency Strength
This is NOT a 1000 pips per day system or make millions in a couple of months system. This is a trading system I have been working on for about 2 months now while doing some improvements and fine tuning to the system and the EA you will need for it
DO NOT expect all trades opened using this system to be profitable as we will for sure have some bad trades. However, this system should be overall profitable and yielding more profitable trades than losing ones
DO NOT expect to have 100 trades open per day
This system can be used as basket system and also as per trade up to you
===========================
Details on how the system works and how it reached its current state
Some boring background on how the system came to be :
The system mainly relies on BBands which is one of my favourite indicators that I have been using in all my trading strategies for sometime now. But of course as many any other indicator it gave false signals more than I would like to see and also performed very badly in ranging markets. I started using bigger TFs to confirm my signal, ( example : Only take a trade if BBands was giving the same signal on 15M - 30M - H1 charts )
I tried many combos and TFs but still was missing some sort of filter, and so after trying many indicators alongside BB I found MACD to be the best one I have tried with it.
I was also always amazed by currency strength meters and I think I may have tried every single version available of them out there and in working with currency strength meters I noticed that each currency pair is not in a world of its own but rather all pairs are some how working together. ( example if GBPUSD was in an uptrend move I will find EURUSD, NZDUSD, AUDUSD etc.. also on an uptrend while USDCHF, USDJPY etc.. on a down trend ) and that made me understand that it's the strength of a certain currency ( most of the times influenced by big impact news ) that determines the general movement of a pair
It only made sense for me to merge both together in one strategy since I'm a big fan of both and have seen them both work very well
How the system works :
Attached Image
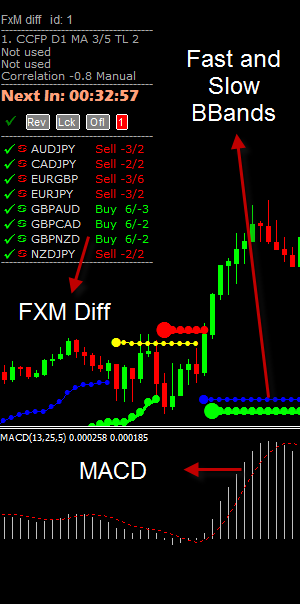
Three filters work together to eliminate as many bad trades as we can
1) A fast BB + A slow BB to give the current general direction and trend of the pair
2) MACD to confirm the trend and direction and also to avoid getting in a trade during reversals or divergence
3) FXM Diff Currency Strength Indicator to show the best time to take a trade when the strength of the pair is in the same direction as BB and MACD. It's also very useful for re-entries in a strong long lasting trend after pull backs and reversals.
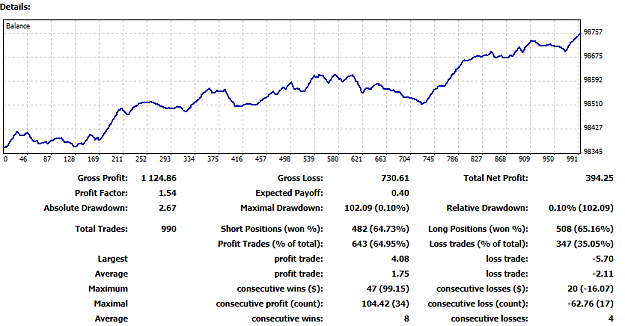
And this is a statement to show how this strategy is performing the past couple of weeks but before you look at it you need to know those points :
1- I have been trying many combos between settings for the three indicators used and what you see below is all of them combined not just one of them
2- The statement goes only back couple of weeks because this is when I was done having a stable version of an EA to work with them not just fixing errors and bugs I encountered
Attached Image (click to enlarge)
This is the result of some of the combos alone I found working well ( Again goes back for a couple of weeks )
P.S : AIO means all time sessions combined
Attached Image (click to enlarge)

Attached Image (click to enlarge)

Attached Image (click to enlarge)

==================================
Why Did I create this thread ?
1) This thread was created to take it as a chance to hear feedback and suggestions from other members here and do my best to implement those ideas into improving the system and eliminate as many bad trades as we can
2) I also enjoy coding and would like to challenge myself into adding more and more options and ideas to the indicators and EAs I made
3) The EAs and indis I made ( and only them not the ones by other Authors ) have an expiry date of 2 weeks and I intend on constantly updating with new versions that will have longer expiry dates AS LONG AS THERE IS INTEREST AND ACTIVE MEMBERS CONTRIBUTING. THE EXPIRY DATE IS NOT TO SELL IT LATER BY ANY MEANS AND THAT IS A PROMISE. With that being said I understand a lot may not like that fact and depending on how the thread will be received I may remove it completely.
4) Why did I put an expiry date to begin with ?
Because I have created previous beta versions of similar EAs and Indicators and helped other members in making personal customized EAs based on their needs without hearing a single word from them ever again once they receive the goodies. Most don't even bother reporting any bugs that I know for sure exist or anything.
Lets repeat that again : The EA and Indis I created have an expiry date and I explained above why. However I intend on updating them on regular basis and extending the expiry date as we go or maybe even remove it at all
=====================================
The Expert and Indicators and Scripts needed for the System
VIP 1 : YOU MUST YOU MUST YOU MUST install the script ( LoadHistory-1 script ) before you attach any of the indicators or the EA or the templates or else you may get zero divide errors and false signals
VIP 2 :
1) MACD ( Already included in your terminal )
2) BBands ( I don't know the author but whoever you are it's amazing )
3) FXM Diff ( Big Shoutout to : FX Madness for creating one of the best if not the best Currency strength meters out there )
4) A simple ( and ugly ) indicator I made to show you the current state of MACD and BBands for 5M and 15M combined ( Hoping I can make it more visually appearling one day ROFL ).
5) An indicator to analyze your trading performance that I made to help show you the best times you should trade in ( I am planning to add more features to it )
6) ATR in pips ( Don't know the Author but it's a simple yet very useful indicator )
7) An EA I made to open and control trades based on various settings
8) Various templates with EA and indis settings
P.S 1 : Your indicators and EA MUST be on 15M charts
P.S 2 : The first signals you get once you install the indicators may be false so wait at least 15-30m before you enable trades with them
==============================
EA Settings Explained
- Magic :
Choose a unique number for the EA to open and handle your trades. ( It must be different than any other magic number you have for any other EA on the same terminal )
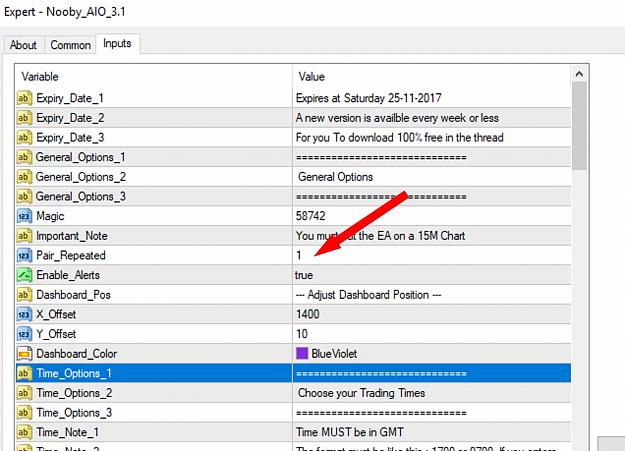
- Pair Repeated :
How many times do you want the same signal for the same pair to be repeated in the FXM Diff indicator before the EA opens an order ( Only make it more than 1 if you have multiple instances of FXM Diff with different options )
Example :
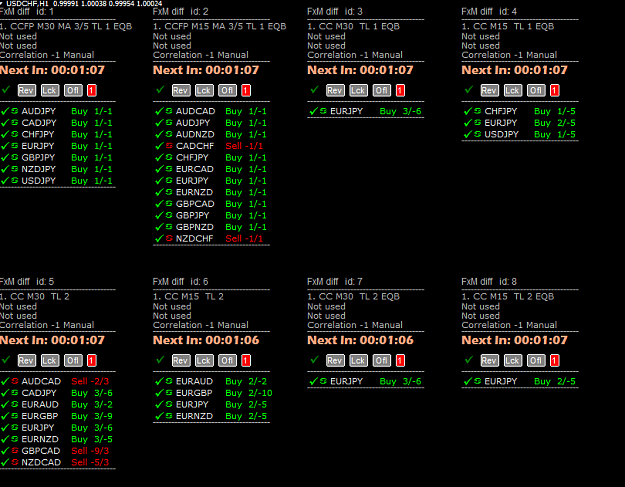
Attached Image (click to enlarge)
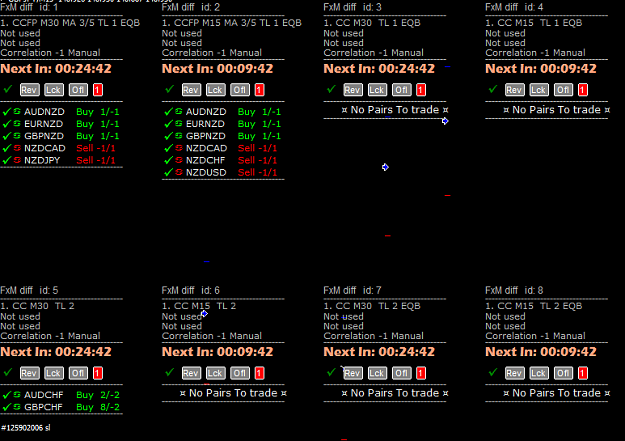
AUDNZD is repeated 2 times
EURNZD is repeated 2 times
GBPCHF is repeated 1 times
So if you chose repeated = 3 the EA will not take any of those signals but if you chose repeated = 2 it will take AUDNZD and EURNZD and not take GBP CHF. If you chose repeated = 1 it will take all of three signals
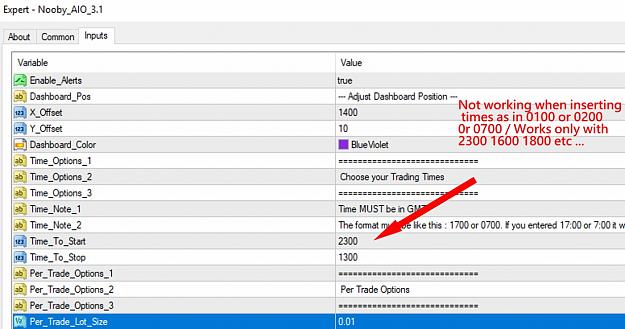
- Time to start and Time to stop :
They MUST be in GMT ( In the EA it tells you what's the current GMT time and your current broker time to make it east for you ) and it also must be in this format : 700 or 1700 or 1530. If you make it 15:30 or 7:00 or 7:00 AM it will not work.
Also do note that the EA will not open trades at the open time and close all trades at stop time. But rather the EA will start checking signals from the start time till the stop times
- Per Trade Options :
This is where you control your TP and SL and TS for each trade the EA will open
- TP / SL mode :
If you chose : Hard TP SL -- This will just put SL and TP and TS based n the number of pips you decide
If you chose : Factor of ATR -- It will check the DAILY ATR OF PERIOD 14 and then take the TP, SL, TS as a factor of that.
Example : If you chose the TP factor to be 0.25 that means your TP = 0.25 * DAILY ATR OF PERIOD 14 OF THAT PAIR
- Enable Basket mode :
P.S : All basket settings are in $ and not in pips
If set to true the EA will treat all opened trades as one basket and close all of them when they reach the levels of TP and SL you choose
If set to false the EA will treat each opened trade as its own with the TP and SL settings you assigned for them from above
- Enable Basket Factor ( Calculated in $ and not pips ) :
If set to true your basket TP and SL will be calculated based on how many trades are open. Example, if you chose TP factor = 2 and there are 10 open trades then your Basket TP = 2*10 = 20$
If set to false then your Basket TP,SL,TS will be taken from the options you entered above
- Enable Basket Lock Profit :
The lock profit here is not meant to close some trades or partial lots from your trades but rather adjust your SL to a certain level.
Example ( If you set your Lock profit to 10 and your lock profit factor to 0.5 )
Once your total profit reaches 10$ or higher that EA will move your SL to 10$ * 0.5 = 5$
That means whatever happens next your SL will remain at 5$ until your total profit drop to 5$ or reach the second Lock Profit level
P.S : If you enable Lock profit it will auto-disable Basket Trailstop ( Not trade trailstop )
- Disable trades on News :
If set to true the EA will not take any trades for the pairs you will choose from the options below for the times you will choose
P.S 1: The times must be in GMT
P.S 2 : All my results posted above were taken while this was set to false which means the EA took trades whether there were high impact news released or not
----------------------
All included templates have shown good results for the past 2-3 weeks but I personally use template 15 as i prefer to use multiple FXM Diff settings together
Changelog : 9-11-2017
EA v3.2 : Click Here
EA v3.3 + Detailed Trading Report 3.2 + A new template with basket mode enabled and higher TP / SL : Click Here
--------------------------
10-11-2017 : Click Here
** General update :
- EA + Indicators expiry time has been extended to 9 - December 2017 ( The expiry date will be updated at least once per week as promised to keep extending it as we go )
- EA Preset Options has now been included in the new rar file. BEFORE YOU ATTACH THE NEW EA VERSION YOU MUST CHANGE OPEN YOUR CURRENT EA AND COPY THE MAGIC NUMBER THEN PASTE IT TO THE NEW EA AFTER YOU LOAD THE EA SETTINGS FOR IT
- There are 3 EA preset options included :
If you're using any template from 4 to 14 use the EA settings 4_To_14
If you're using templates 15 use the EA settings for TPL_15
If you're using templates 17 use the EA settings for TPL_17
--------------
** EA v3.3 :
- There is now no internal condition in the EA's login on the minimum FXM Values it will accept, it will now include all values you see from your FXM Diff indicator(s) you chose to work with in your template
- The Broker Time and the GMT time will now show accurate readings even if there are no trades running
--------------
** Trade_Report v3.3
- Added the option of showing the trading report of each currency and not just time sessions
--------------
Next indicator I'm working in is the suggestion from rushmag to show the maximum pips gained and lost for each pair to give a better idea to where we need to put our TPs and SLs
------------------
11- November Part 2 :
I noticed a bug in Trade Report 3.3 where if you delete the indicator some of the lines will still remain in there un-deleted, so here is the fixed version
Click Here
Tuesday 14-November : Click here
- Added buttons to the EA v 3.4
- New indicator to show the max and min pips each pair have made today
Update 2 for Tuesday 14-November : Click Here
- The pips indicator should now show the correct max / min pip values
- The Trade report indicator will not disable the currency report if you chose to
--------------------------
19-November : BEFORE YOU DOWNLOAD ANY TEMPLATE CHECK THIS POST
Click here
--------------------------
Attached File(s)
Attached File(s)
---------------------------
--------------------------